| |
|
| |
|
|
|
|
|
| |
|
|
| |
|
|
|
| |
|
|
|
| |
|
|
|
| |
|
|
|
| |
|
|
|
| |
|
|
|
| |
|
|
|
| |
|
|
|
| Older, darker jury images changed to match the newer photographs that I took of the jewelry. |
|
|
|
Older, darker jury images changed to match the newer photographs that I took of the jewelry. |
|
|
| Besides the original photograph of this painting being way too dark, terrible specular highlights from on camera flash became evident when the image was lightened to look accurate. I guess it could have been worse had an iphone been used. |
|
|
| Picture of artwork taken at an art show. Added a background and shadowing as if it were photographed in a studio. |
|
|
|
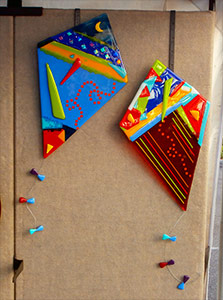
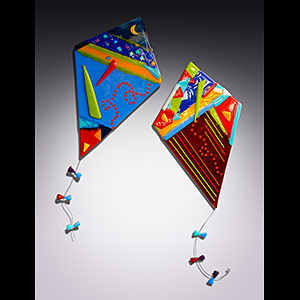
| The diagonal gradient didn't cut it, especially since each image in the set looked like it had a different background. |
|
|
|
|
Almost impossible to tell it's a table in the short period of time the jurors get to evaluate the images. But changing the background allowed the sculptural piece to be understood immediately. |
|
|
|
|
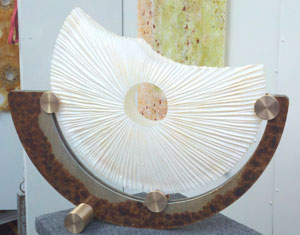
| Originally photographed in a natural setting made it difficult to see the details of this sculptural clock. The graduated background accenting the shape draw your eye directly to the clock and make it's features really pop. |
|
|
|
| Don't you just hate it when your only booth picture has the back door open, the name sign provided by the show, and dead grass. |
|
|
|
| The artist provided images taken on a black background. When the background was changed, the objects came to life. |
|
|
|
| The artist was working with me to take a clean booth picture, setting up the booth in their backyard, going back and fourth making changes I suggested. By the time the final composition was arrived at, light was running out but I was still able to make the glass look translucent. |
|
|
|
| Rescuing a picture of artwork taken at an art show, adding a background and shadowing as if it were photographed in a studio. |
|
|
|
| Originally photographed on a dark background made it next to impossible to see the features of this glass sculpture. The lighter background with correct shadowing and halo made the features really pop. |
|
|
|
| Photographed on a similar toned background as the glass bottle made it impossible to see the stopper until the background was changed to make the glass pop. |
|
|
|
| Rescuing a picture of artwork taken at an art show, adding a background and shadowing as if it were photographed in a studio. |
|
|
|
| Hot spots were removed and the piece was color corrected. Then the background was changed so the work really pops. |
|
|
|
| Hazy morning light transformed into beautiful saturated colors. The distractions (chair, weights, mirror and through the back of the canopy) were eliminated. |
|
|
|
| The piece was photographed by the artist on black fabric but not enough light was used. Contrast and brightness were corrected and it was dropped into a graduated background with proper shadowing to make it look as if it were photographed that way. |
|
|
|
| The banner and all the other distractions, including the background in the hall seen above the booth was removed, and the draping turned opaque.. A really clean booth picture with no distractions was the result. |
|
|
|
| The bead was originally photographed by the artist. Color and brightness were corrected. Then the bead was extracted and a graduated background and shadowing was added to make it pop. |
|
|
|
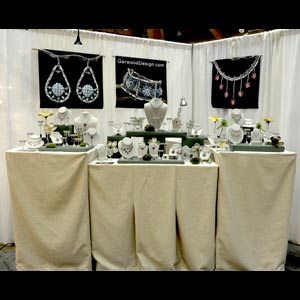
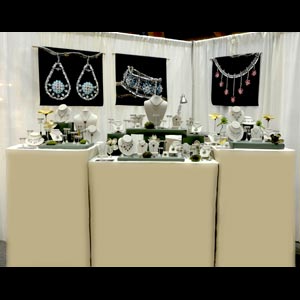
| Color and brightness were corrected. Then the booth was cropped and the transluency was taken out of the walls. A really clean booth picture was the result. |
|
|
|
| Originally photographed in the artist's booth, it was color corrected, the hot spots were eliminated and then it was dropped into a background with shadowing that accented the piece. Additionally the base, which was cut off in the original photograph, was completed. |
|
|
|
| The sculpture and stand were taken out of the booth and then new artwork was added to the walls. The distracting lighter area under the panels was also fixed. |
|
|
|
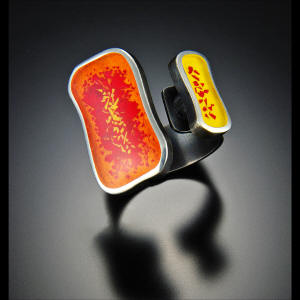
| After adjusting the contrast and brightness, it was color correct to bring back the original yellow color of the beads and feather. The darker background behind the feather brought back the translucence that the feather originally had. Once the new background and shadowing was added, the piece became dynamic. |
|
|
|
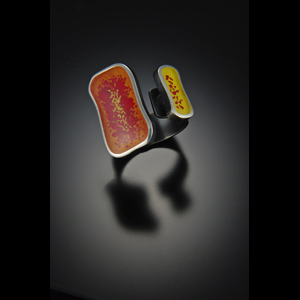
| Contrast and color adjusted and hot spots removed. Then the earrings were taken out of their setting and dropped into a backgroud that accents the shapes, and shadowing was added. |
|
|
|
| A booth filled with mirrors. Besides fixing the floor and thelight coming in under the display panels, all the mirrors were selected and a neutral non distracting gradient dropped in. They still look like mirrors but don't take away from the artwork. |
|
|
|
| Talk about blindingly white. Jury pieces should never be photographed on a white background because it blinds the jurors, especially if you want them to see detail in the jewelry. And if the artist that follows the images on white has had their work photographed properly, the jurors eye's haven't adjusted so the next artist suffers also. |
|
|
|