|
tips on
photographing Your own art |
|
my
digital jury image services |
|
|
|
Lighting Small Objects Made Easy
A review of the Cloud Dome |
|

|
|
By Larry Berman and Chris Maher
|
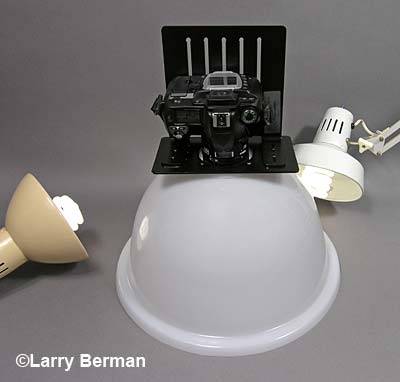
| Another great lighting tool for small
objects, especially jewelry, is Cindy Lichfield’s
Cloud Dome.
It’s a ten inch high white Plexiglas dome with a camera mount on the top.
|
|
One variation of lighting with the Cloud Dome is to use
daylight florescent lights to create a soft diffused effect as shown in
the photo below.
|
|
Lighting using the two daylight florescent
Cloud Dome arrangement
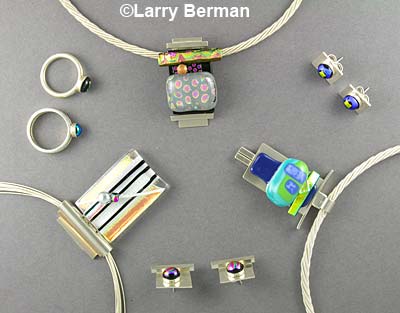
Jewelry by DK
Solomon
|
|
Highly reflective items like jewelry are not easy to shoot.
They can act like a mirror, reflecting everything around them. Your lights
become glaring hot spots, while darker reflections make the surface
details hard to see. The professional solution is to “tent” the object, so
its surface reflects the soft even illumination. That kind of setup can
take up a lot of space, and be time consuming to build. The Cloud Dome, on
the other hand, is small and quick to set up and use. |
| Shooting can be as simple as attaching
your camera, setting the item to be shot on a suitable background, and
centering the dome over it. Ideally, the soft diffuse light surrounding
your subject will then flow beautifully across the reflective surfaces.
|
| Getting great pictures is rarely that
simple however. First, you will find it makes quite a bit of difference
how you light the outside of the dome. We have found that using spots of
light, rather than a wash of light on the outside of the dome gives much
more control. Also, cutting sheets of diffusion material or white tissue
paper into pieces and strategically taping them to the domes surface can
work wonders to tone down hot spots. |
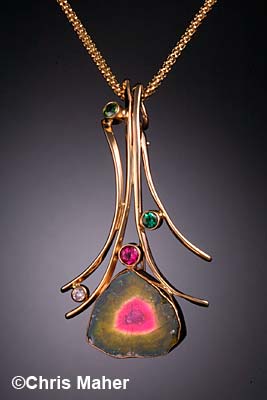
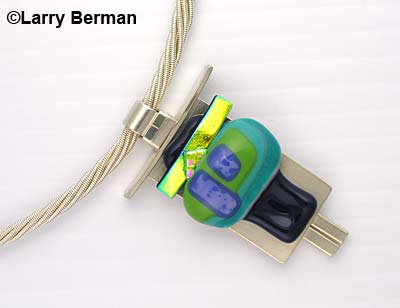
| Some items, especially jewelry that has
both shiny metal and faceted stones, need a mix of soft and hard light to
look their best. The snap of a diamond dies under flat light, but you can
bring back the sparkles by using a small mirror to bounce a direct light
right on the stone. This tough to do when the Cloud Dome is totally
covering the item, but easy if you rotating it 90 degrees and suspending
the jewelry in front of it. An added advantage of this approach is the
ability to easily create out of focus backgrounds that can make your
subject stand out beautifully. |
| |
|
To see how Chris shot these pictures
of his wife's jewelry
click here or scroll down |
| If you are shooting larger items, you can
buy Extension Collars in two sizes, raising the Cloud Dome by seven or
twelve additional inches. Another useful accessory is the Angled Extension
Collar for shooting three-dimensional objects from a more oblique angle.
The Cloud Dome starts at $169 with the universal camera
bracket for prosumer digital cameras and $189 with the Pro “L” Bracket if
you have a DSLR body.
Both the Lowel Ego and the Cloud Dome are designed to
make it much easier for any photographer to take professional photographs
of small items. They compliment each other, with the light dome being best
for smaller, highly reflective objects, and the Ego being really useful
for items up to about 14” tall. |
|
More information about the Cloud Dome and the Lowell Ego
can be found on their respective web sites:
|
|
More photos taken with the Cloud Dome |
|
Lighting using the two daylight florescent
Cloud Dome arrangement
Jewelry by DK
Solomon
|
|
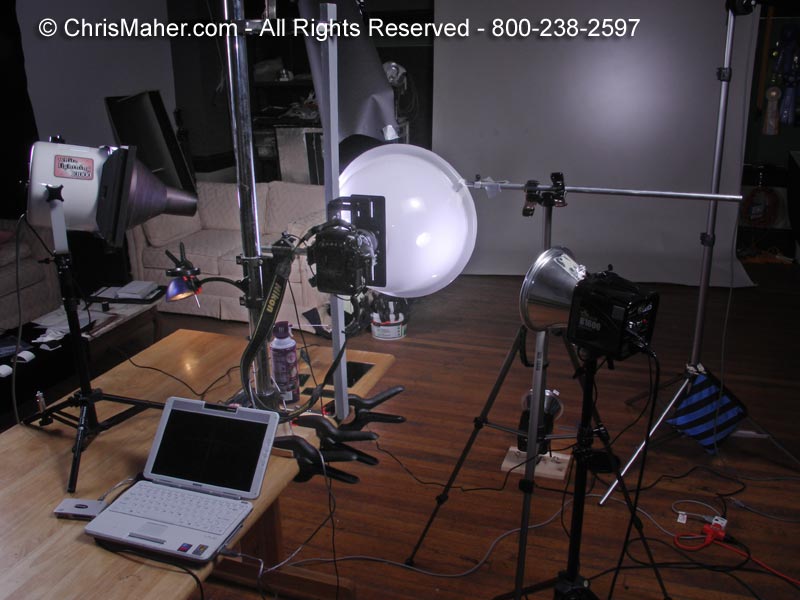
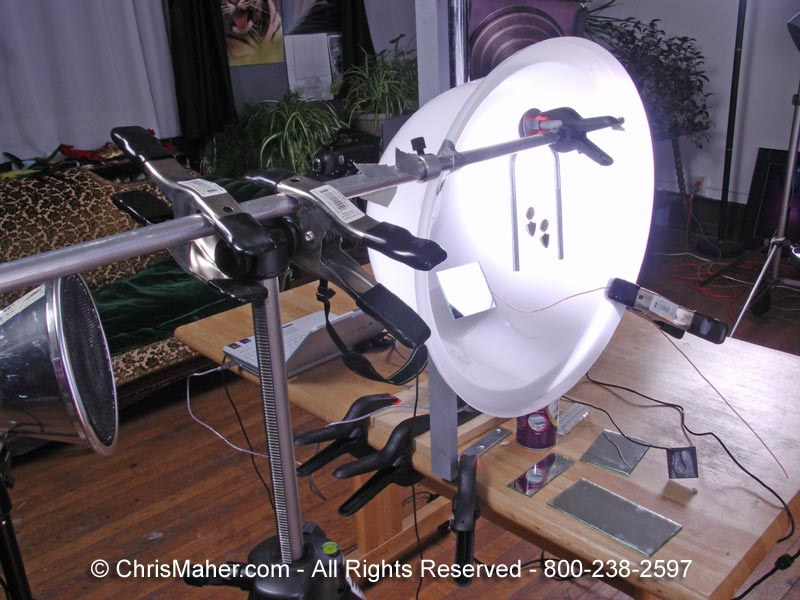
Working with the Cloud Dome suspended
vertically
Each image is linked to a larger image which opens in a
new window
just close it to return to this article |
|
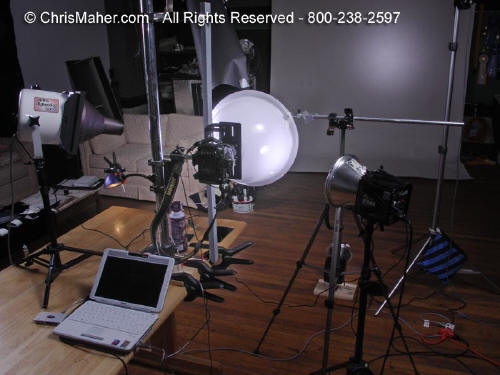
The Cloud dome is attached to a vertical brace, and aligned
with the D70 on the copy stand. The camera is tethered to the laptop with
Nikon Capture. Three lights, including a snooted overhead I only used to
illuminate the mirror that bounced light into the faceted stones. Note the
flash unit on the floor, projecting the spot of light for the background
glow. |

The jewelry was attached to nylon threads strung between a
large U-bolt. A light stand arm was attached to a cranked shaft tripod
head, holding the jewelry the right distance from the lens. The mirror at
the bottom was angled to best illuminate the different stones. |
|
Tips on Photographing Your Own Art |
|
Read my article on
setting your digital camera for the
best quality digital jury images |
|
Hire me
to Prepare your Digital Jury Images |
|
Examples of my jury slide photography |
|
Digital Jury Resources |