How to Photograph Your Booth
Artists and art show staff. Feel free to download and distribute this article as long as it is properly credited to me and not changed.
Artists – join the new Facebook group to have your jury images evaluated:
https://www.facebook.com/groups/jury-image-evaluation/
The importance of a good booth picture
How important is the booth photo? Besides the artwork images, the booth image can easily make or break an artist’s career doing art shows by keeping you out of even the shows that are considered easy to get into. Some artists spend a great deal of money having their artwork photographed but don’t even think of improving their booth picture until they start an application, if they even think about it at all. Like the art images, the booth image needs to be read easily without causing the jurors to spend even an extra second understanding exactly what they’re seeing. They should glance at it, consider it professional looking, and then spend their time evaluating your artwork images. For the shows that project the images, the jurors are seeing all the images simultaneously for not more than 20 seconds and sometimes closer to 10 seconds. If you don’t think that the booth image is that important, attend an open jury and seroquel online view your competitor’s images, or attend a mock (image evaluation) jury and listen to the critiques of the jurors.
Bill Snyder photography booth
Tips on how to take a good booth image
The best prednisone drug place to photograph your booth is not at an art show where you don’t have control over the environment or the weather. It’s better to set it up for the picture at home on an overcast or cloudy day so there is even lighting and no sun streaks which might draw the juror’s eyes. Make sure not to have any signs, identification, ribbons and especially no people in the booth picture. I’ve seen booth pictures with so many people in the booth that you couldn’t tell what they were selling. When asked why, the artist told me that they thought to have a better chance of getting in if their artwork was popular. I’ve also seen pictures of an empty canopy because the artist didn’t understand that they actually had to show their artwork in the booth picture.
https://www.budandalleys.com/clomid-over-the-counter/
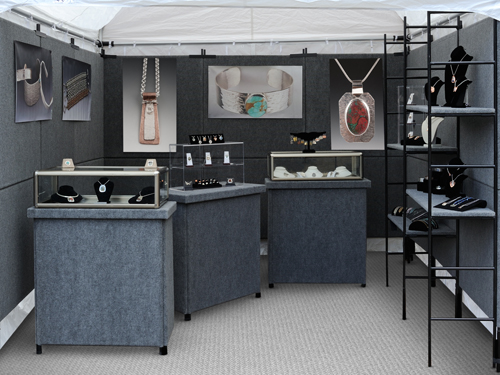
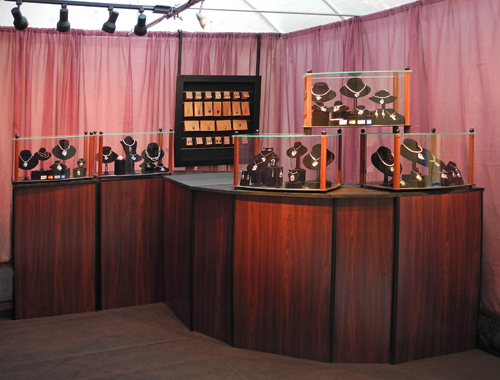
Diane Wright jewelry booth
Setting the booth up
The canopy must be white and all three walls need to be seen in the picture. The sides of the canopy need to be in place so there is nothing distracting showing through the booth to draw the juror’s eyes. You can shoot two walls from a corner but still need to see along the third wall to satisfy the three walled booth picture requirement. The last thing you want is to be forced to create different booth pictures for each application. The floor must be clean of debris and leaves or put down a carpet.
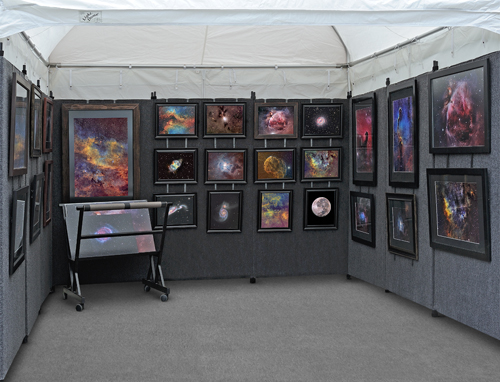
Jim Ulmer ceramics booth
Arranging the artwork
If you’re photographing 2D work it’s best to take the glass out of the frames to eliminate reflections before shooting. If you have multiple pieces on each wall, line up the tops of pieces on the top row so they are all at the same top height around the booth. It makes the booth look more professional and enables the juror’s eyes to flow. And a symmetrical looking booth reads easier and looks more professional. If you use bins to display unframed art, make sure to include bin(s) in the booth picture. The booth picture needs to be representative of how your booth will look at a show. If you’re photographing 3D work and are using tables, consider hanging large photographs of your pieces to take up wall space and make the booth look fuller. Think of it as a way to show the jurors additional jury images. If you use tables with covers, make sure the covers are wrinkle free. Consider using pedestals or desks from Pro Panels or Armstrong Display. Or at least raise your table height to approximately 40 inches. If possible, don’t have objects overlapping from the camera position and make sure everything in the booth faces the camera. Consider the camera position as the juror’s perspective, not how you normally set up the booth. If your booth contains mirrors, make sure that they aren’t a source of distraction when the booth is viewed by the jurors. If your mirrors are for people to see themselves when trying on accessories or clothing, remove the mirrors from the booth prior to taking the picture. If you’re selling mirrors as part of your artwork, either position them to control what they reflect or (what I do in the booth pictures I edit) use Photoshop to drop a gradual gradient onto the glass.
Sher Jacobson jewelry booth
Setting the camera
Use a tripod. It eliminates camera movement and it’s the only way to check object placement from the camera angle before you shoot. Follow these basic suggestions on how to set your camera for maximum image quality. Lowest ISO and stop down the lens for maximum depth of field using either Aperture Priority or Manual exposure settings. The tripod will compensate for the longer shutter speed. If possible set your camera to Auto Bracket at one stop intervals. That will give you three exposures for each picture, one lighter, one darker and one what the built in meter thinks as accurate. When using Auto Bracketing, some cameras require taking three pictures and some automatically take three each time you release the shutter. Slightly darker images edit better than lighter images. It’s easier to bring out detail in the darker areas than to put detail back into areas that are too bright.
https://reyndersmcveigh.com/getting-lasix/
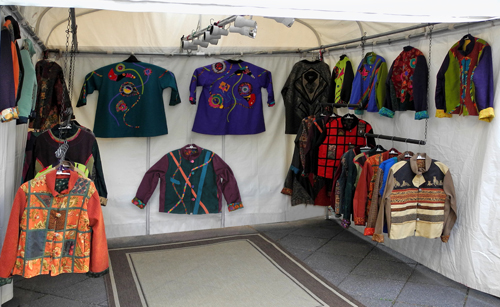
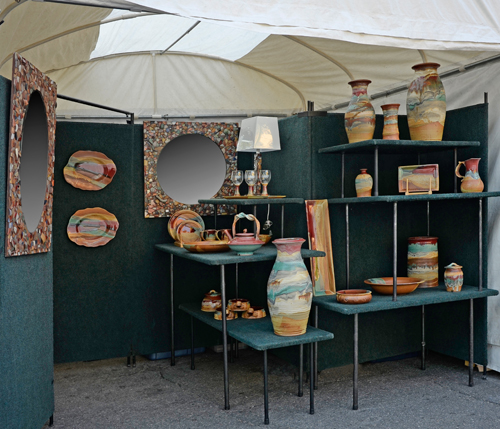
Sandy Adkins wearable fiber booth
Taking the picture
Do not use a cell phone camera. They loose detail in the highlights which can’t be recovered. Understand that no matter what camera you use, your image will still need editing for it to be accurate. Shoot wider than the canopy so the walls can be squared up before the image is cropped. Shoot the back and right wall seeing along the left wall to satisfy the three wall booth rule. The back and right wall booth picture acts as a right hand book end in your image set when the images are projected. That makes it a natural movement for the jurors eyes to flow back into your image set. Leaving the tripod in position, take the memory card out and pull the images up on the computer. Take note of everything that can be changed to improve the picture. Go out and make the changes, shoot again and check again on the computer. If you’re working remotely with a friend or consultant, ask for feedback by sending the pictures while you’re shooting, not after you break the booth down.
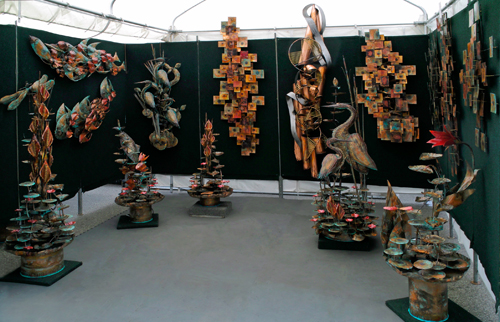
Yos Belchatovski sculpture booth
How I shoot a booth picture
I prefer to set up my tripod so that the camera sits approximately 56 inches from the ground. I use a camera with a 28mm wide angle lens. If leveled properly, there is no distortion. And using 28mm, I can shoot from a short distance in front of the booth, especially useful if it’s at a show with narrow isles. I also carry something that can be held over the lens (which acts like a lens hood) to prevent stray light from hitting it and causing flare in the picture.
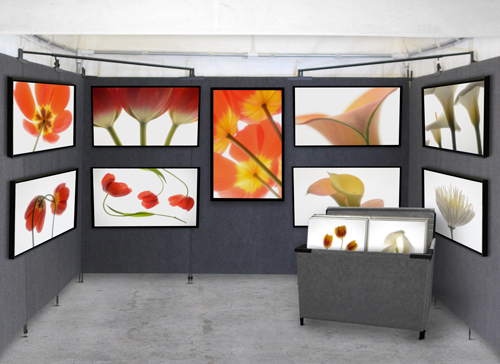
Larry Berman photography booth
Summary
A good display picture is not easy and it takes time to get it right. If the jurors are distracted and waste even a second or two noticing something out of place, you might be losing 10% of the time they are looking at your work. Be careful of an overly bright white canopy because it’s human nature that our eyes are drawn to the brightest part of an image or brightest image in a presentation. Crop most of the white canopy top off and crop in tight on the sides. They only need to know that it’s an outdoor picture under a white canopy and need not see the entire top to understand.
Artists and art show staff. Feel free to download and distribute this article as long as it is properly credited to me and not changed.
All booth images taken by Larry Berman and used with permission of the respective artists. This article is listed as a resource on the ZAPP web site, was published in the NAIA newsletter, and was published in Sunshine Artist Magazine.
See examples of my artwork photography and jury image improvements. Give me a call at 412-401-8100 with any questions or to get started https://www.outboundsailing.com/get-xanax-online-low-price/ working with me.
Work with me to improve your booth image