Customizing the Light Dome Canopy
Customizing the Light Dome Canopy
If my Light Dome was a computer, I’d call this hacking it. I originally chose the Light Dome after purchasing a used Trimline because the Light Dome was lighter and had fewer parts. In short, it was easier to assemble for someone like me now in my 60’s. It wasn’t that there was anything wrong with the Trimline, I had used a Craft Hut for over ten years sometimes doing about 40 shows a year, very similar to the trimline. I used Pro Panels for my walls. Besides the basic nine panel three walled booth, I also had 20, 24 and 30 inch panels so I could do different arrangements of my booth depending on the space. If I had room, I created a walk though in the back or on one of the sides. I’ve always customized my display. But as I got older, it was time to simplify things.
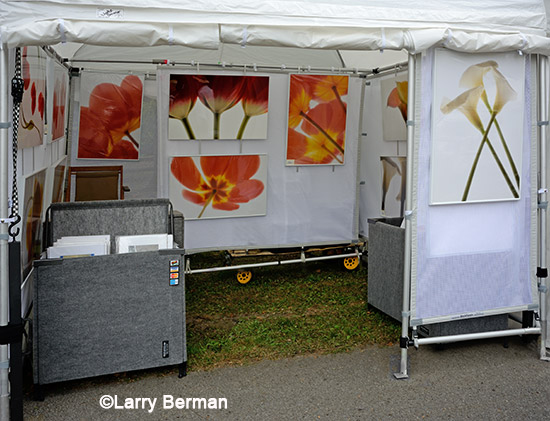
I stopped doing shows for a few years around 2006 and sold my Craft Hut. I couldn’t keep away so a few years later I decided to order a Light Dome with their mesh walls. I ordered it with a doorway in the back wall which made the back wall seven feet wide. Light Dome sells a convertible mesh wall for the doorway. It can be used as a full ten foot wall or wrapped around the upright pole leaving a three foot doorway on the side. The problem is that the design of the convertible wall allows the doorway only on one side. What if there were a tree behind the booth on that side? So I convinced them to send me a seven foot mesh wall so I could position the doorway on either side, also having the option to use it on either side of the booth if I were to set up against a wall or with another booth backed up behind me.
The mesh walls I ordered from Light Dome were their sheer mesh which lets much less light through. But they were heavier then I anticipated and after using them for about a half dozen shows, I sold the three walls and ordered a set of regular mesh walls (including one convertible wall) from Trimline. I love the white mesh look with my new high key flower photographs on a bright white background. And the regular white mesh is lighter in weight than the sheer mesh from Light Dome.
Here’s where the customization (or hacking) started.
I ordered two regular ten foot mesh walls and one ten foot convertible mesh wall. I also ordered three and four foot mesh walls for French walls. Then I ordered corresponding framing parts from Light Dome. The aluminum bars on the Light Dome are a little thicker than the steel bars on the Trimline so you need to specify which canopy you’re ordering the mesh walls for because the mesh wall hangers that go over the top bar need to be widened for the Light Dome. Instead of using the seven foot wall on the back of the booth, I moved it forward about three feet so I have storage and a place to sit behind the back wall within the ten foot canopy. The seven foot wall can be positioned anywhere conveniently because I’m using awning supports (24 inch supports are the least expensive) to connect the top full ten foot bar and the bottom seven foot bar to the canopy frame. I love the Light Dome awning supports. They are narrow bars with nylon collars that lock to the narrow bar of the legs or narrow bar of the top frame. That allows me to position the wall wherever I want it and it stays in place. This is especially useful for a jeweler who only uses the space in the front of the booth because they can move the back wall in for added security positioning it where they want and also hang curtains from the top bar. Because I moved the wall with the doorway up three feet, I wanted to put a short wall in the back behind where I will be sitting. So I put the four foot mesh wall there to hang a piece behind my chair. And in the diagonally opposite corner in front of the booth, I set up the three foot mesh wall to hang a picture out front just inside the booth protected by the awning.
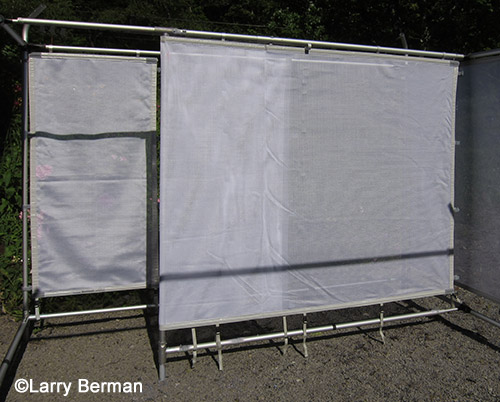
7 foot movable wall
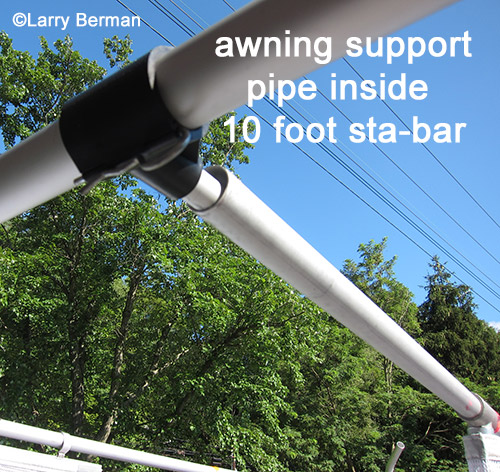
awning support inside sta-bar
The biggest problem using mesh walls, especially the white mesh from Flourish (Trimline) is the backlight effect. On my side walls of the booth, I keep the canopy side walls lowered so the effect is white behind white, minimizing the backlighting and preventing distracting see through. And for my seven foot back wall, I had a friend cut and sew a seven foot wide piece of fabric that velcros around the top bar just behind the wall so you can’t see my inventory stored behind the wall. White behind white.
Years ago I decided to only hang large pieces. The frame size of my last two bodies of work were 22×28 and 24×24 and my latest size is 24×36. To hang these framed sizes I preferred to use strap hangers from Flourish. They made me collapsible hangers that open long enough to hang two 24 inch height frames under each other. These make it easy to hang your framed pieces at the same top height making the booth look really clean. The best part is I can store them in a tripod carrying case so I never misplace any of the hangers.
For unframed work, I purchased two collapsible bins from Pro Panels in a light gray to match my Pro Panels set that I use for rental. That also gives artists an option when they rent my display.
Radiator Hose Clamps
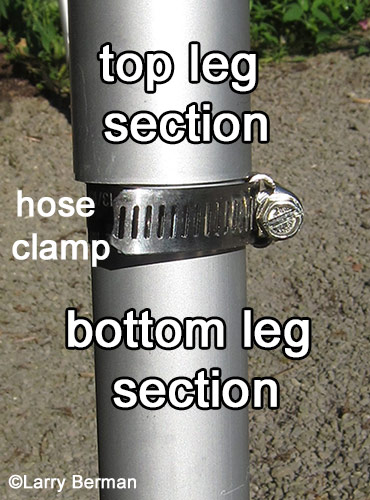
hose clamp support raised canopy leg
Here’s a great tip about how to raise your canopy legs when setting up by yourself. I learned this from watching Steven Lloyd, a metal sculptor, set up his booth at my house for me to photograph it.
Each lower leg section has a hose clamp loosely attached. Then he worked his way around the canopy raising the upper leg section to a comfortable height, raising and tightening the hose clamp with a small screw driver so the leg would stay up. The upper leg section then rested on the hose clamp. When each leg was raised to the same height, he again worked his way around the tent again raising the legs and moving the hose clamps up tightening them. He did that until the legs were fully extended and locked into place. And he left the hose clamps connected to the legs permanently. This works with the Light Dome, Finale, Trimline and Craft Hut type tents.
Weights
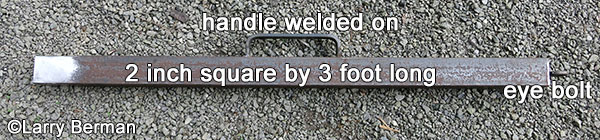
2 inch solid steel weights with handle and eye bolt
It started with a tip from Jim Parker about using 2 inch square solid steel bars. I went to a local fabricator and had them cut me four steel bars 36 inches long. I had them weld a one inch eye bolt to the end and a handle in the middle. Weight was approximately 45 pounds each, about all I can handle. I spray painted the weights with flat black Rustoleum. To make it easier to lift, I cut pieces of exercise mat for the inside of the handles and then wrapped the handles with black gaffers tape. For ratchet straps, I couldn’t find plain black but I did find black and white checkered straps. At least they don’t have any color that would stand out. To keep them flat against the canopy legs, I’m using heavy duty 1.5 inch double sides Velcro wrapped around the weight and tent leg through the handle.
More pictures will be added after I do my next show at Long’s Park.