title

Using Microsoft Office Mail Merge
for Art Show Postcards

Download a pdf (Acrobat) version of this page
Click here if you need Adobe's Acrobat Reader

Art Show Postcard Template
First a short explanation of how I ended up using Microsoft Access as my mailing list program. Like every body else, I started with an envelope and then a shoe box filled with scraps of paper containing names and addresses. After getting a computer I bought the first mailing list program that looked like it could fulfill my needs. After spending two months frustratingly entering data into a program that was in no way intuitive, I started looking for a better way.

Having already purchased Office Professional, I thought I could do it in Microsoft Word alone. I found out it was workable but limiting in the options for outputting the data. After talking with Chris Maher about it, he spent an afternoon figuring out how to transfer my data from Word to a format that Access could read. (If you need to do this, see Microsoft KnowledgeBase article Q96899) He then talked me through setting up my first Art Show query and we printed out the labels for my postcards. Over a period of time, I discovered that the address information could be printed directly onto the postcards along with the message, saving the cost of labels and the extra work involved.

Remember, there are many ways to achieve the results I can get. Once I figured out a method that worked, I stuck with it, taking notes about my method along the way. Please don't let it get to you if it doesn't work correctly the first time. Programs such as Microsoft Word and Access can be confusing and often are much harder to learn than they should be. 

The following instructions assume you have your customers names and addresses in an Access database. Word and Access can be linked to merge the data seamlessly, and that link process, once set up, can be used again and again.

Step by Step Instructions for printing postcard backs
with Microsoft Word and Microsoft Access.

First open Access and create a query to select the names of the customers you want to mail post cards to. (If you are not sure how to create a query, open Access' help index and search under "queries, creating") I use the name of the show (or city) and group all the shows in that area. Chris uses a zip code range and thinks it's easier. Save it with at descriptive name and you will be able to use it each time you want to send information to people in that area. 

Now open Word and create a postcard template the same size as the postcards you intend to mail out. This will serve as a template for all of your mailings, only your message will need to be updated.

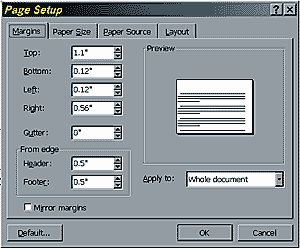
On the File Menu choose Page Setup. The first tab lets you select the margins for your post card, the screen capture to the right shows the settings I use.

Page Setup
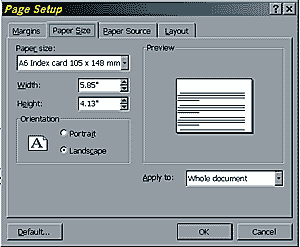
Paper Size Next, select the Paper Size tab. Enter the actual size of the post card you are using. This is a screen shot that shows a standard Continental card stock.

Create a two cell table. (If you are not sure how to do this, search in Word's help index under "tables , creating").

Type your Art Show information in the left cell of your post card.

Click in the right cell of your postcard and using the Tools menu select Mail Merge. This will bring up the Mail Merge Helper window.
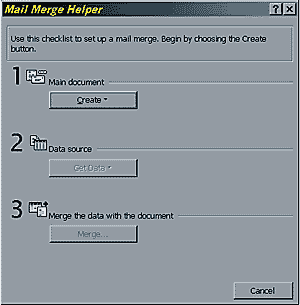
Mail Merge Helper

Click on number 1, Main document - Create then select Form Letters and tell it to use the Active Window. (actually, any of the options will work here) Now click on number 2, Data source - Get Data. and choose Open Data Source. This is where you scroll to find the data that will be entered on the postcard. In this dialog box you will need to change the Files of Type setting from *.doc to *.mdb. (Access data bases use the extension *.mdb so you have to specify that's what you are looking for or else it won't show up). Now navigate to the folder that has your Access Database in it, and select it. If you have more than one query, select the one with your mail list in it. After choosing your query, close the form letter setup box.

Word then needs to set up the main document (your postcard template).

Query Options 
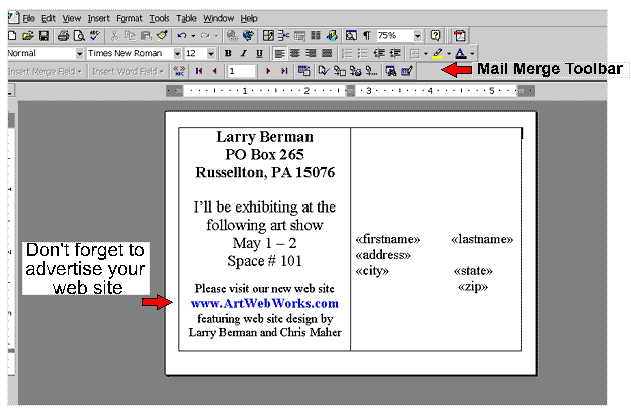
Insert Merge Field (the left hand button on the Mail Merge Toolbar).

Pick the fields for name and address and space the entries within the right hand cell properly.

Take the cell borders out so it looks like a normal postcard.
Tables / Borders (choose none for borders)

Save as a new template for that particular show. You can edit the show information next year.

On the Mail Merge Toolbar, select a button called "Mail Merge" (it's a smaller button towards the right hand side).

Word will then pull the requested information from the database and create all your postcards, ready to print.

There are multiple ways of doing this. If anyone has any information to add to this, or a correction to point out, please e-mail me.
Return to the top of the page

All photos on this site are available for stock or fine art sales
contact Larry Berman for more information

Slide scanning for ZAPP and other digital jury systems

Jury Slide Photography

1970s ABA and NBA Basketball photographs
specializing in Julius Erving (Dr J) photographs

Order prints from any gallery

Support BermanGraphics

Contact Us

Participate in the Art Shows Forum

Web site content © Larry Berman

email Larry Berman - larry@bermanart.com

412-401-8100