|
| |
|
 |
|
|
|
|
|
Prosumer Digital Cameras in
the Photo
Studio
by Larry Berman and Chris Maher
Prepared for Shutterbug Magazine |
|
* Equipment *
Table Top Photography * Flat Art *
* Conversion to 35mm Slides *
Conclusions * Links *
*
Digital Photography Resources * |
|
The Equipment |
| Less expensive digital cameras are beginning
to replace tradition film cameras for casual shooters, but can they do the
job of professional level cameras in a studio? For some assignments, the
answer is clearly yes.
We work with many artists and craftspeople that are selling their
creative products on the Internet. They are in constant need of high
quality images of their latest work. Digital cameras are an obvious choice
for creating these images, but without control and repeatability the
results can be less than satisfactory.
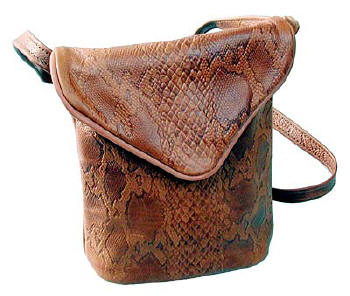
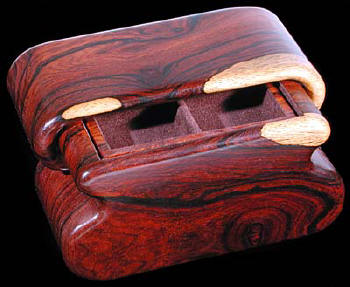
To demonstrate the Nikon Coolpix 990 in a traditional studio setting,
we photographed a leather pouch created by
Mark Mowen,
a wooden box produced by
Nick Molignano and
a painting by Ginny
Herzog.
We shot the product pictures with a Coolpix 990 and a pair of Nikon SB
24 flash units. Then we shot the overview pictures with a Dyna-Lite dual
flash head kit that was set up on light stands in the corners of the
studio and bounced into a second set of umbrellas. We connected the
Coolpix to the SB-24’s with Nikon’s SC-18 and SC-19 cords. The Dyna-Lite
system was linked to the camera with professional quality Paramount sync
cords that contained built in trigger voltage protection circuitry and
Nikon proprietary fittings. Nikon recommends that the trigger voltage for
external flashes should not exceed 5 volts, or damage may result to the
camera. |
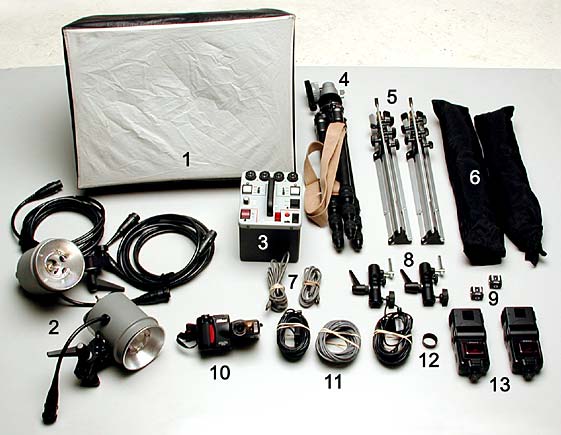 |
- Chimera Soft Box
- Dynalite Flash Heads and Cables
- Dynalite 1000 watt second Power Pack
- Tripod
- 2 Light Stands
- 2 Umbrellas
- Nikon Sc-18 and SC-19 flash cables
- Bogen (part # 2905) Swivel Umbrella Adapter
- 2 Nikon AS-10's (AS-E900 can also be used)
- Nikon CoolPix Digital Camera
- Assorted Paramount Synch Cords with Nikon proprietary
fittings
- Lens Hood from RX
- 2 Nikon SB Flash Units
|
| There are two reasons to use studio lighting -
consistency and control. Studio strobes like Dyna-Lite have modeling
lights, which allow you to view the effect of your lighting adjustments as
you are making them. And their wide range of available power settings
makes it easy to control lighting ratios. The Nikon SB flash units lack
modeling lights, of course, so only a quick review of your LCD will show
you the exact effect your lighting adjustments have made. But other than
the lack modeling lights, their power and flexibly made them quite
suitable for the small objects were photographing.
Incandescent lights, such as halogens or photofloods, are an option but
have two disadvantages. First, they have a more limited spectral output
than the electronic flashes. A digital camera can compensate for white
balance and produce neutral tones, (no more tungsten film or filters
required) but it can’t render a blue with the precise tones if those
frequencies of light are simply not being produced by the light sources
themselves. Second, they produce a great deal of heat, complicating their
use with light modifiers such as soft boxes and umbrellas. Hot lights have
some advantages of course, such as relatively low cost, and the ability to
see exactly what changes look like as you adjust the lights. The simplest
alternative, shooting available light next to a window or in open shade,
also has it’s advantages especially in not having to purchase any lighting
equipment, but it lacks both consistency and control.
top
of page |
|
Shooting on a Table Top Set |
 |
| We began by placing the items to be shot on a
tabletop, and setting up a pair of umbrellas to light the work.
Umbrellas are a versatile and relatively inexpensive way to control
lighting. They naturally wrap light around the object you are
shooting, causing rich modeling and soft, open shadows. We attached
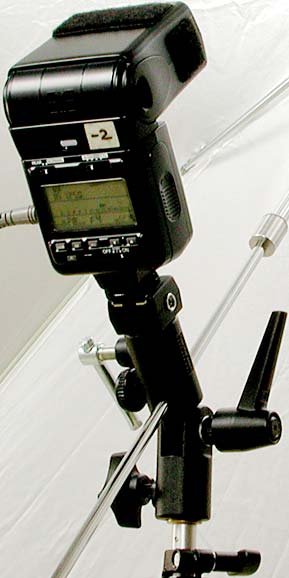
the SB-24 flashes to Nikon’s AS-10 multi-flash adapters, then attached
them to the Bogen Swivel Umbrella adapters, which were connected to
the light stands. Next, we hooked up our Nikon SC-18 and SC-19 flash
cords to the flash units, linking them to each other and to the
camera. The AS-10 served two purposes here. It allowed the flash unit
to attach to the 1/4x20 tripod thread of the Bogen adapter and also
allowed the flashes to be connected to each other and synch with the
camera. We then set the flash units to manual and
used the incremental power settings on them to control our exposure,
checking the effect of each exposure test on the camera's LCD screen.
Additionally we checked each set of images on our laptop computer
before making any lighting or set changes. At this point we were ready
to begin shooting. |
|
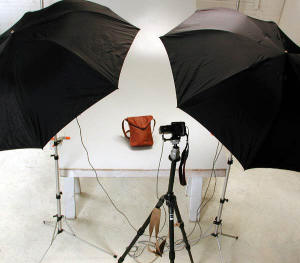 |
| The same dual umbrella lighting with SB-24's was used
for the leather handbag and the wooden box. Because of the high gloss
of the wood finish we shot the box on a piece of black velvet. This
emphasized the lines in the wood grain, and prevented a wash of
reflected light from obscuring details.
Don't let the complexity of the professional Dyna-Lite system scare
you. The same results can be achieved by using either the Nikon SB's
or your own flash units. |
|
 |
 |
|
top
of page Shooting Flat Art |
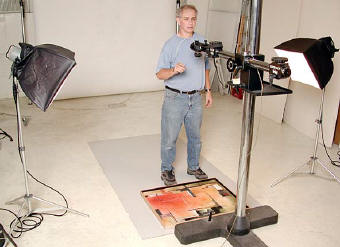
Dave Smith Photographing Flat Art |
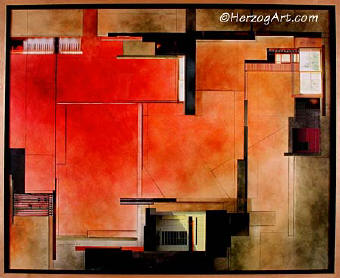 |
| Pittsburgh photographer
Dave Smith
helped us set up these illustrations. To photograph a painting Dave uses a
camera stand (he only uses a tripod when on location) and shoots with a
Nikon F4 with the macro lens and a grid screen to visually keep the
painting squared to the camera. He also prefers to use Chimera soft boxes
at 45-degree angles instead of umbrellas to control the direction and fall
off of the light. It is important to note that when the required output is
a billboard sized image, he switches to his 4x5 view camera instead of
35mm.
We took the accompanying photograph of the painting with our CoolPix
from the same position on the camera stand. If we were to shoot the same
type of picture at home, we would set the camera on a tripod with a right
angle column and use a level on the CoolPix to keep it square to the
floor. Then we would bounce our Nikon SB-24's into two matching umbrellas
the exact same distance to the painting at 45-degree angles. |
|
Step by Step – Shooting Ginny Herzog’s mixed media
painting. |
1) Check the level of the floor using a bubble level.
2) Place the camera on a studio stand or study tripod with a right angle
arm that can extend the body out over the painting, or reverse the center
column so the camera is suspended below the tripod, with a clear view of
the painting on the floor.
3) Place the bubble level on the camera back to level it as well.
4) Align the painting in the viewfinder, raising or lowering the height of
the camera, check to insure the level is still true.
5) Set up your lights, one on each side, at a 45-degree angle. We used a
pair of soft boxes. The idea is to create soft, shadowless illumination,
spread evenly across the entire painting.
6) Test your exposure, then to be sure bracket up and down by a half stop. |
| In post processing the image in Photoshop we found that
the Nikon Coolpix’s lens introduced an unacceptable amount of barrel
distortion which bowed the straight edges of the frame. This was easily
eliminated with the LensDoc Filter from
Andromeda. LensDoc is a Photoshop compatible plug-in that corrects barreling and
pincushioning distortions in digital images.
top
of page |
|
Conversion of Digital File to 35mm
Slides |
There are times when the acquired digital files need to
be converted to 35mm slides. Artists may need jury slides from their
images, or other kinds of traditional presentations may require them.
We’ve found that when properly created even relatively small digital files
can be made into slides that project beautifully. Here are the basic
steps:
1) Shoot at full resolution that the camera is capable of.
2) Come in as close as you can, keeping 35mm proportion in mind.
3) Call your local lab or service bureau to find out how best to prepare
the digital file for their film recorder. (Our lab requires a file that is
sized to 35mm-proportion (7.33x11) and converted to an 8 megabyte TIF)
--I've listed two labs that we have experience with in creating slides
from digital files in the Art Show
Section version of this page |
|
Conclusions |
| From the quality of the images we were able to make, we
concluded that, yes, prosumer quality digital cameras can serve an
important role in studio shooting, especially when the output is intended
for electronic media, like the web. But one must not forget that a well
composed and properly exposed photograph is just as important whether
shooting digitally or shooting with film. Lighting, composition, and
exposure are key factors no matter what kind of camera you are shooting
with.
Today’s digital cameras do have room for improvement. Not all cameras
have the ability to easily synchronize with external flash units. For
those that do, like the Nikon Coolpix, you may need proprietary connectors
to plug into the camera. And the optics can exhibit flaws, such as
curvature of field that is objectionable when shooting subjects that
emphasizes straight lines. Even so, digital cameras offer some real
advantages compared to film cameras. With a digital camera you can view
your tests immediately on a monitor and see exactly what you are getting.
The cost of film and processing is eliminated, and no additional scanning
step is required before post processing in Photoshop is done. And the
resulting images can be outstanding.
top
of page |
|
Links |
|
|
|
This copyrighted article was
prepared for
Shutterbug Magazine and may not reproduced |
|
Digital Photography Resources
top of page
Web Site Contents |
|
