How to use a Light Weight Tripod
I was contacted by an artist who wanted me to walk her through taking a better booth picture, something I’ve done with hundreds of artists over the past few years. I have the artist set up their booth in their driveway or yard and email me the images. After each picture I call and discuss changes that need to made to improve the image for jurying. It requires setting the camera to capture at the largest pixel dimensions and using a tripod.
The tripod is critical because it eliminates the variable of camera movement when shooting pictures of your artwork or display for jurying. And for a booth picture, it enables you to move the camera incrementally if I think changing the angle of view can improve the picture.
When asked what tripod I use I explained that there was no correlation between what I use and the tripod an artist would purchase. I prefer Gitzo tripods and Really Right Stuff ball heads, clamps and camera plates, and have a great deal of money invested in them. I also have two very light weight compact Velbon tripods (pictured below) that I leave in each vehicle. The Velbon I use is the 343E. It collapses to under 18 inches and weighs under 2 pounds. Don’t bother searching for it because I purchased mine about ten years ago.

So, what tripod do I recommend? Not knowing what’s available because not every local camera store carries the same tripods, I think it’s more important to learn how to use whatever tripod you purchase so you can get sharp images.
How to use a tripod
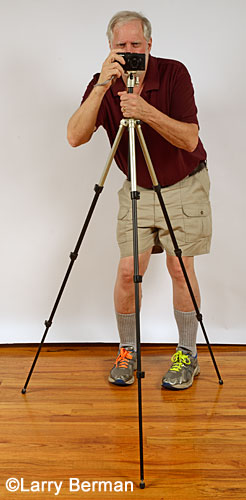
The weakest part of a tripod is the center column. The tripod itself consists of three legs which are fairly stable depending on how well it’s made. But the center column, which most people extend to a height that doesn’t require them to stoop down, becomes the weak link and sways when pressure is put on the camera shutter release.

The trick to stabilizing a light weight inexpensive tripod is downward pressure. First set the legs of the tripod so they face left, right and away from the side where you are standing (see full picture above). That way you won’t trip over a leg, possibly knocking over your tripod and breaking your camera. Extend the center column up only about six inches. Grip it with the left hand applying downward pressure and operate the camera with the right hand. The downward pressure makes a light weight tripod act just like a heavier sturdy tripod. Combining the use of a tripod with setting the camera to the lowest ISO will give you maximum quality images of your artwork.
Tips on how to set your digital camera for maximum quality images of art.
I developed this technique for using a light weight tripod with a point and shoot camera. If you use a DSLR (interchangeable lens camera), keep your left hand on the lens and right hand on the grip to operate the camera to keep it steady on the tripod.
Two alternative techniques. Using the self timer will allow you to press the shutter release and give the tripod mounted camera time to stop moving before the picture is taken. An electronic or infrared release allows you to take the picture without touching the camera. But it depends on what’s available for the particular camera you use.
Check out the section on photographing your own artwork.