| The Rectangle or Elliptical Marquee tools are your basic fixed shape
selection tools. Hover the mouse over the Rectangle tool to see the
other tool options. |
|
| You can use the Magic Wand tool and play with the sensitivity to
start a selection and finish by using the lasso as described below.
 | Holding down the Shift key lets you add to a selection as you
continue clicking within the desired area with the Magic Wand tool. |
|
|
|
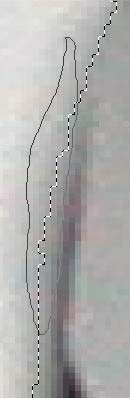
Image #2
|
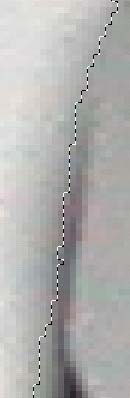
Image #3
|
|
| Using the lasso tool
| Draw your selected area as close as you can but don't worry if
you're not exactly on your desired line. Image #2 |
| Holding down the Shift key lets you add to a selection. |
| Holding down the Alt key lets you subtract from a selection. |
| Add to or subtract from your selection by drawing a series of
small ovals around the outside of the area coming in close to what
you want to select (Image #3). By using the Shift or Alt keys you can either
make your selection narrower to come in closer to the desired
line, or wider if you came in too close. Work your way around the
image at a higher than normal magnification. Like in my above
examples where a gray object has been photographed on a white
background. The selection was originally created by using the Magic
Wand on the background. While working at 600% I drew small ovals
holding down the SHIFT key to add to the selection. |
| At various times you should save the selection. Selection>Save
Selection and name it. After saving the selection you should save
the actual PSD file you're working on. Then if you loose the
selection, you can always open the file up and load the selection
Selection>Load Selection and continue where you last saved it. |
| Selections can be moved incrementally, one pixel at a time,
using the arrow keys. |
| If you get the error message telling you Warning no pixels
were selected or Warning no pixels are more than 50% selected try
setting the feathering to a lower number setting. |
|
|
| The Quick Mask tool can be used to add to or subtract from a
selection.
| When in the Quick Mask mode, the color swatches on the tool bar
become White and Black. The White showing as Red as you draw to add to
a selection. The Black showing as Clear (the original image) as you
subtract from the selection. |
| You need to be using a drawing tool, like the paint brush for the
Quick Mask tool to work. |
| As you move in and out of the Quick Mask mode, the image will go
from a painted selection to a lassoed (with the marching ants)
selection. |
|
|
| If you're using Photoshop 6, you should download and
install the 6.01 patch for
Windows or for
Mac |
If you're having trouble with your tools, it's
recommended to delete your preferences file to return all the tools to
their default settings.
Your preferences can be found in (on my Win ME machine):
C>Windows>Application Data>Adobe Photoshop 6.0>
Adobe Photoshop 6 Settings>Adobe Photoshop 6 Prefs.PSP
Windows
Close Photoshop and navigate through Windows Explorer to your
preferences folder. If you're nervous MOVE the preferences file to the
desktop. Restart Photoshop and the default preferences will
automatically be regenerated. Depending on your operating system, the
preferences might be in a different but similar location. You can also
do a search for the prefs.psp file.
Mac
I don't know where your preferences are located. |
|