iPhone Camera Photography Tips
No, I haven’t gone over to the dark side and still recommend using a real camera to photograph your artwork or booth for jurying. But I have been investigating getting better quality pictures from my iphone camera. And by better quality, I don’t mean improved composition. I mean technically improved pictures with less blurriness (sharper) and better exposure.
There are a great many examples of good iphone pictures on the internet and there’s one thing most of those pictures have in common. Interesting subjects or compositions, proper exposure and good lighting. And those pictures that you find on the internet may be the only place that they are located because the one thing that sets the mobile phone camera off from a real camera is it’s ability to connect and upload to the internet as soon as the picture is taken.
But getting back to improving my own iphone pictures. My biggest problem is taking pictures without the iphone camera moving. You hold the camera in one hand and press the button on the screen with the other hand, or even sometimes with the same hand. It’s an excellent recipe for camera movement. The new iphone 6 Plus (but not the 6) camera has image stabilization built in, which somewhat compensates for camera movement.
So what can you do with other versions of the iphone. Over the past three years, I’ve purchased a few small light weight table top tripods to use with my iphone. Overall, the more stable ones have usually been a little too large or awkward to carry around with me. But perseverance has paid off. My latest find is really small and compact and makes you want to purchase an extra to give away to a friend when they admire it. It’s the Joby Gorillapod Micro 250.
Couple that with a tripod mount for smart phones, it makes a small, easy to carry package that takes up very little space and virtually no weight in my shoulder bag. Lately I’ve been using the Glif cell phone tripod adapter.
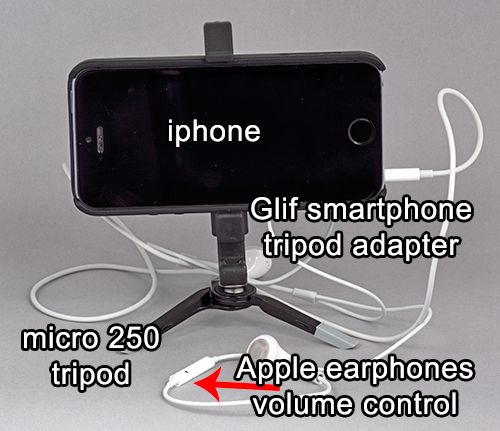
iphone with Glif smartphone adapter and Micro 250 tripod
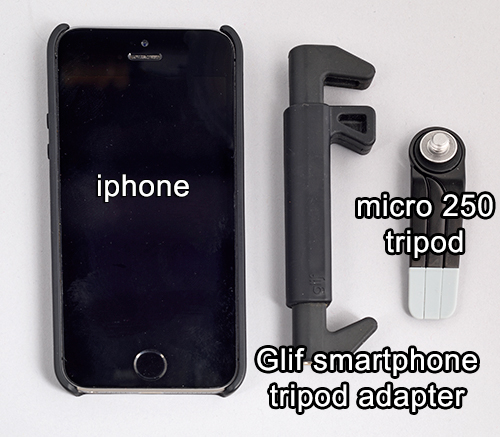
iphone with Glif smartphone adapter and Micro 250 tripod
The final piece to the puzzle on getting sharp pictures without camera movement from your iphone is the cable or shutter release. A little known fact is that Apple ships every iphone with a shutter release cable. It’s the earphones volume control. When the camera app is open, the up or down volume lever activates the shutter. But in testing the earphones as a shutter release, though it worked all the time, I found it clumsy and awkward to use. A much better option is a short delayed release using the self timer, which gives you time to make sure the camera phone is steady when the shutter is released.
I purchased the big brother of the Micro 250 tripod, called the Micro 800 tripod. It’s more sturdy and a little heavier in a not much larger size, but the smaller one is sufficient for an iphone. Even better if you put your finger on the flat part of one of the legs.
The RetiCam smartphone tripod adapter is a little sturdier and heavier than the Glif. But it’s also a little wider and doesn’t fit in my shoulder bag as easily as the Glif does.
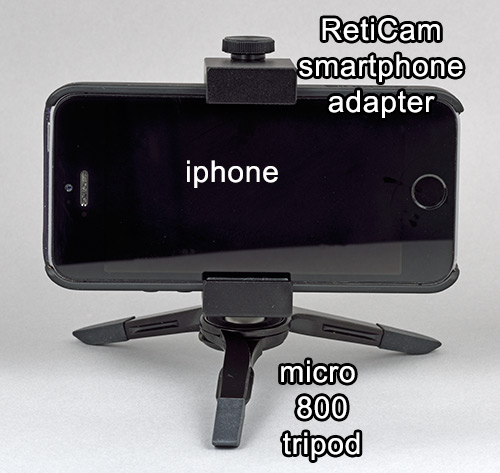
iphone with RetiCam smartphone adapter and Micro 800 tripod
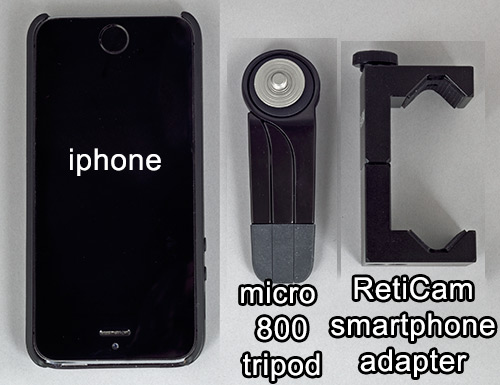
iphone with RetiCam smartphone adapter and Micro 800 tripod
So my preferences lean towards the Micro 800 tripod with the Glif smartphone adapter. All would be perfect if the Micro tripods were able to position the iphone camera for vertical pictures. But I guess you can’t have everything, that is unless you use a smartphone adapter with a real tripod that you happen to have with you.
The iphone camera with IOS 8 has it’s own way of tweaking exposure, though it’s not a setting that can be locked in. It works on an image by image basis. When you compose the image, tap the screen on the object you want to appear in focus. An icon of the sun appears to the right of the box and you can raise or lower the exposure by sliding the sun with your finger. Seeing real time allows you to lower the exposure to control areas in the scene that might appear too bright. This is compared to exposure compensation on a real camera.
For spontaneous picture taking, I don’t think anyone will take the time to set up a tripod, iphone adapter and earphones shutter release, not even me. But for important planned pictures, like to photograph your artwork or booth, it would be something that will give you a much higher quality image to work from.
I just counted and realized I have over twenty photography apps on my iphone. But what’s even more interesting is I’ve barely scratched the surface of only three or four. I’ve edited a few images with Photogene. I use Actual Pixels to tell the pixel dimensions in height and width of images emailed to me to make sure that they are large enough to work on. And I just started playing around with PureShot, a minimalist camera app that allows saving the file as an uncompressed TIF or a higher quality JPEG than what the original camera app saves images at. I recommend the higher quality JPEG over the 22 megabyte TIF for convenience and time and memory savings. It also offers settings for exposure compensation and auto bracketing. The auto bracketing takes three pictures at three different exposures in rapid succession from a single push of the shutter release. It also has one of my favorite settings from newer high end point and shoot cameras where you can assign a minimum shutter speed (of 1/30 second) to minimize camera shake. Four things that can help you take better photographs of your artwork or booth.
If you’re using the pictures for jurying, three things need to be done. The images need to be edited to adjust color and contrast and then crop to optimize how they will appear to the jurors. Remember, the closer the images are to square, the larger they appear to the jurors. Then they need to be formatted for jurying. And finally they need to be uploaded into your ZAPP profile. If you’re working on a computer, none of these steps are an issue when using an image editing program like Photoshop Elements. But working on an iphone or ipad, it gets a little tricky.
Like I posted earlier, I’ve been experimenting with Photogenie as an editing program. Once the image is edited, it needs to be formatted for ZAPP. At this point if you’re not wanting to further complicate the process, you can just upload the image into your profile and let ZAPP format it when applying to shows. But the built in browser (Safari) in your iphone and ipad doesn’t allow for choosing an image and uploading it. My solution to this is an alternate browser called iCab Mobile which I use as my default browser. Do a search for it in the App Store as well as all the other apps I recommend. Some are free and some cost a few dollars but I’ve found it well worth the investment.
iCab Mobile gives you much more control over images than Safari. You can choose images from your Camera Roll and upload it to a specified location on the internet. This is something I’ve tested. I took a picture with my iphone and was able to upload it into my ZAPP profile, actually stopping at my own JuryImages web site to format it 1920 square with black borders.
So in conclusion, this article has walked you through taking higher quality images without camera shake, editing and formatting them for jurying and uploading them into your ZAPP profile. Good luck with your applications.
A good follow up to my article on how to set your camera to photograph your artwork.