Getting Started Photographing Your Own Art
The easiest way to get started photographing your own artwork.
1 – Decide on a background
2 – Control the lighting
3 – Set the camera properly
If you’ve done art shows you’ll understand what I’m talking about. It’s the quality of light and how good your artwork looks in your booth under your canopy. Why not put that great light to your advantage and use it to photograph your artwork.
My recommendations start with setting up your canopy (if you do art shows) outside on an overcast or cloudy day. If you don’t do art shows, the investment in a $200 EZUp is much less expensive than purchasing lighting or hiring a photographer.
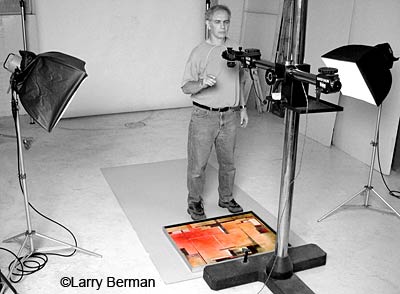
Setting up the Lighting and Background
Attach three walls and put the fourth wall on the ground. That will give you soft diffused lighting and the side wall on the ground will bounce light back up making the lighting more even. Attach your background to the back wall. It could be arranged as a sweep onto a table for 3D work. Larger 3D work might require the background to sweep onto the ground. A sweep means the background flows from behind to under the art so you don’t see a horizon line. Flat 2D art needs to be suspended and will be cropped to the edges so the background won’t show. Backgrounds should be neutral in color (black, white, gray, graduated) and not introduce color. White backgrounds for jurying blinds the jurors when projected. Additionally they should not have texture because that artificially inflates JPEG file size on the completed jury image.
Setting up the Camera
Given a choice, a DSLR with a macro lens is the best camera and lens combination to use. The macro lens will enable you to take pictures without introducing distortion. If you use a zoom lens, set the zoom in the middle of the zoom range to minimize distortion. Same if using a point and shoot camera with a built in zoom lens.
You must use a tripod
Turn off vibration reduction. It will actually introduce movement if the camera is set up on a tripod. Set the ISO to the lowest the camera is capable of. For most cameras, that will usually be 50 or 100. Higher ISO values introduce noise in the image. Set the camera so that you control the aperture or lens opening. You can do that using manual exposure or using aperture priority exposure. If you leave the settings choice to the camera it will use a wider aperture, limiting depth of field, in order to give you a faster shutter speed to compensate for camera movement. That is the opposite of how the camera needs to be set to photograph art. Using Aperture priority, stop the lens down to approximately f8 or f11. Using a tripod will compensate for the longer shutter speed necessary.
When composing the picture looking through the viewfinder (or on the LCD if point and shoot), leave room around the art. That will allow room to do perspective adjustments, squaring the piece up and correcting converging edges which allows cropping to the edges of the artwork without cutting into it. For 3D work there needs to be enough background showing so the image can be cropped and still show a pleasing amount of background visible for jurying. 3D work cropped too tight in the photograph causes visual tension in the viewer.
Shoot using a three stop bracket. That means one image is what the camera thinks is the correct exposure, the other two are one stop lighter and one stop darker. In general, the darker of the three exposures will be the best image to work with because it’s easier to bring out detail in darker areas than it is to put detail back in brighter areas. This can be done using the auto-bracket function built into many cameras or when the camera is set on manual exposure, bracket using different shutter speeds keeping the aperture set for maximum depth of field.
Shooting JPEG is OK but it needs to be maximum quality JPEG using the most pixels the camera is capable of.
Turn off auto focus if using a DSLR. The way auto focus works is that the camera will focus on the closest object or part of the object within the focus range. Manual focus allows you to control where the camera is focusing. That’s why a lot of jewelers have trouble keeping the entire piece of jewelry in focus, even when using an expensive macro lens. The camera automatically focuses on the front of the piece and runs out of depth of field towards the back of the piece. Setting it on manual and focusing half way between the front and the back of the piece will keep the entire piece in focus when the lens is stopped down properly. I photograph jewelry, usually at f22, and control where the camera is focusing.
More tips on doing your own artwork photography
Examples of artwork photographed under soft diffused canopy lighting
If you’re an artist working with me to do your final post processing, I recommend sending me the first few images to critique to make sure you’re doing it correctly. Remember, every image needs to be post processed. Images straight out of the camera are never correct.